** Update April 25, 2019**
As I have been going through these myself, I have found that a bunch of these configs were not working properly (pretty much all the IPv6 labs + switch labs + some misc labs). I have updated the config file link accordingly. If you downloaded it before and some of the labs are "invalid" when you try to load them, please try downloading the newest version. Please let me know if you have any troubles. I will include a link in the file section to a package of PowerShell scripts that I ended up making while working with all these (2,000+) config files.
*** End Update ***
OK, so this is probably going to be a pretty long post. After messing around with a bunch of different options, I have found this to be the best setup for using the INE ATC topology for studying for my CCIE. I used VIRL for the first few months, but it was annoying to have to load the configurations for each of the labs into the routers each time I loaded the topology. I started out with some SuperPuttY scripts that automatically did it each time, but it was a less-than-perfect solution.
Bottom line: Properly followed, this guide will allow you to send "config replace flash:config/atc.lab.name.here.cfg force" to all devices, and immediately configure all devices for the appropriate lab. It should continue to work if you shut the topology down/restart your computer, and then reboot the topology.
NOTE: Feel free to use these configs with your own topology. This post shows how to build one with EVE-NG but the configs will work with pretty much any setup of the INE topology. The same can be said about the Secure_CRT-AutoConfig python script - it should work to more easily set up the configurations with pretty much any setup of the INE topology with little or no modification.
On my computer with CSR1000v routers, it takes only a few seconds to switch between initial configurations of any of the ATC labs. This is extremely useful for using the "lab card" strategy that I will be putting forth in a future post.
If something in this guide is wrong, please let me know in the comments so I can correct it.
Credits
Credit to Calin Chiorean for making the EVE-NG topology that mine is based off of.
Credit to Jedadiah Casey for making the first iteration of configs that mine are based off of
Credit to IT Hitman and Tony E for tutorials on getting EVE-NG to work on Google Compute
Credit to everyone else that I missed - as I have tons of links in here :)
Files
Download these to your computer (everything is ASCII - no funny business!)
Link: INE-CCIE-RSv5-Topologies.zip
Description: Contains 10-Router + 4-Switch INE ATC topology for IOL, IOSv, and CSR1000v
Update: Also contains 20-Router + 4 Switch INE topology for IOL, IOSv, and CSR1000v
Link: CCIE_RSv5_INE_ATC_CFG.zip
Description: (Updated April 2019) Contains INE ATC configs for all three (IOL/IOSv/CSR1000v) image types to go with the above topologies
Note: Only contains configs for ATC labs at the moment - I will update with foundations/mock labs once the time comes for me to do those
Link: eveNG-SecureCRT-AutoConfig.zip
Description: If using SecureCRT, this python script will save you some time
Link: ConfigManipulationScripts.zip
Description: A collection of PowerShell scripts that I ended up making while working with all these (2,000+) config files. I figured some may find them useful.
prepend_lines_to_targets.ps1 - (add some lines to the front of a list of files)
print_first_lines_of_targets.ps1 - (print the first x lines of a list of files)
recursive_find_replace.ps1 - (very useful bulk/recursive "find and replace")
remove_blank_lines.ps1 - (remove all blank lines from a bunch of files)
targetfiles.txt - (used by some of the above to narrow down actions/results)
tar_subfolders.ps1 - (use to tar everything back up)
Step 0 - Requirements/Assumptions/Performance Discussion
Your choice of software/hardware will have a huge impact on performance. My system is an Intel Core i7-7700k (4-core, 8-logical @ 4.2 GHz base clock), overclocked 9%, with 64GB of RAM installed. This is a high-end-ish system but not top-of-the-line. I can't boot all of the "heavier" images at the same time. I write a bit about "Staggering Boot-Up" in Step 4. Read below to see how my machine runs each of the image options. Scroll down further to see my comments on using Google Compute as a platform.
It is worth noting that it says on the EVE website that AMD processors are not supported, so do some research if you have or want to use an AMD system.
Quick note: UKSM (Ultra Kernel Samepage Merging) allows EVE-NG to use the CPU to reduce memory (Google if you want more info).
I have built topologies for three different IOS images:
## IOL (IOS on Linux)
After messing around with these, I can recommend this option as long as you keep in mind that some things aren't going to work properly, or aren't supported at all. It is very fast, and doesn't require much in the way of resources. I haven't been using it that long, but I have had a few problems with some of the features working properly, and there are tons of BGP features missing.
How it runs on my system: Hardly anything + fast boot
Recommended System: as long as your computer isn't super-old, most systems should run this
## IOSv
Slower and more resource-hungry than IOL. This is what I recommend using unless you have a bunch of RAM like I do (in which case, I recommend the CSR1000V).
How it runs on my system (10 IOSv Routers + 4 IOSv switches):
UKSM Off: 6GB RAM used, All 8 logical processors running about 50%
UKSM On: 2.5GB RAM used, All 8 logical processors running about 55%
How it runs on my system (20 IOSv Routers + 4 IOSv switches):
UKSM Off: 9GB RAM used, All 8 logical processors running about 75%
Recommended System: 8GB RAM minimum + processor with 8 logical cores
## CSR1000v (This is what I have been using these days - I like it best)
This is fast (after it finishes booting - it boots slowest of all for me) but requires tons of RAM and slightly more CPU than IOSv. Supposedly supports more features than any other virtual option, but I haven't had problems with IOSv in the context of my CCIE studies yet. Each CSR1000v instance uses 3GB of RAM. With UKSM turned on, you may be able to get along with just 16 GB of RAM, but you better have a decent processor.
How it runs on my system (10 CSR1000v Routers + 4 IOSv switches):
UKSM Off: 33.5GB RAM used, All 8 logical processors running about 60%
UKSM On: 10.5GB RAM used, All 8 logical processors running about 75-80%%
How it runs on my system (20 CSR1000v Routers + 4 IOSv switches):
UKSM Off: Does not run - CPU could not handle it - couldn't tell if RAM would have been enough. CPU-wise I was close (booted up 15 CSR1000v OK). I imagine a 6-core equivalent like the i7-8086k (almost same proc as mine, but 6-core) could do the trick, but still unsure about RAM (it will be close and some paging/swapping will probably have to happen if it works).
UKSM On: Eve-NG's website specifically states not to use this with more than 10 CSR1000vs
Recommended System: 32GB RAM + decently quick processor with 8 logical cores
Obtaining Images
You will have to obtain images on your own. I was able to download the IOSv/CSR1000v image from the
Cisco VIRL portal, because I also purchased a VIRL licence ($200). If you have a VIRL license, go to the download section in the portal and download "vios-adventerprisek9-m.vmdk.SPA.156-1.T" and/or "csr1000v-universalk9.16.6.1.qcow2" and "vios_l2-adventerprisek9-m.03.2017.qcow2". IOL images are available around the internet.
Bottom line: you have to figure out how to get your own CSR1000v/IOSv/IOL images.
Google Compute
Doing it on the cloud if you have a toaster for a computer don't want to build/buy a new one
It is also possible to run EVE-NG on Google Compute (which gives you $300 free credit to start. That should give you about 1,000 hours (based on 8vCPU/7.2GB RAM you get with a "n1-highcpu-8" instance, which I recommend), if you remember to shut it down when you aren't using it.
I tested it out and it works great. Here are the two resources I used:
I tested out the IOSv topology with the "n1-highcpu-8" instance type, and it ran OK but changing configs took over 1 minute so Still, that is your best bet if you want to make the most of your $300 free credits. If you use more than 8 vCPUs, performance is much better, but I don't think you can use your $300 free credits when using more than 8 vCPUs :/ I tested out the CSR-1000v topology on there with 10 vCPUs and 40GB of RAM (costs about 36 cents/hour) and the performance was pretty good, even though the CPU stayed pegged out at 100%. I didn't try with only 8 vCPUs...
This guide is mostly focused on doing things with VMWare, so if you are using Google Compute, then read a whole section before taking action because you may have special instructions. One note that I have about using Google compute is that you want to select a 40GB hard drive or so (more like 400GB if you are using CSR images!). Even though you don't need this much space, your hard drive throughput is tied to your hard drive size, so the topologies will take a long time to boot up if you only give it 10GB :)
Step 1 - Install Software
Install
VMWare Workstation (I am using VMWare Workstation 12 Pro, but I am pretty sure VMWare Workstation Player will work just fine). AFAIK, VirtualBox will not work.
Install
EVE-NG (free - and amazing!).
If choosing Google Compute:
This will take a little more tinkering (it did for me anyway), but if I was able to get it to work then you probably can too.
I recommend starting with the video but checking out the blog post at the same time.
Step 2 - Allowing access from the lab to your local machine (or the EVE-NG instance)
Once you have EVE-NG installed:
Here is what my "/etc/network/interfaces" looks like for eth1:
# Cloud devices
iface eth1 inet manual
auto pnet1
iface pnet1 inet static
address 172.16.1.132/24
bridge_ports eth1
bridge_stp off
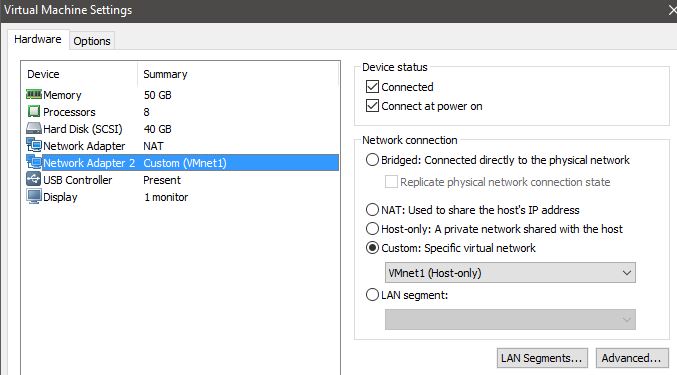
Note that I used "172.16.1.132" as my IP. You may use something different for your VMNet1 address space... You can check what your VMNet1 IP space is by issuing "ipconfig" at the command prompt, and looking for "Ethernet adapter VMware Network Adapter VMnet1", or by going to Edit -> Virtual Network Editor in the VMWare Workstation main window.
Here is what mine looks like:
And the interface that I added in the VM:
Note: You should be able to "ping 172.16.1.132" (or whatever IP you use) if this step was successful.
If you are using Google Compute, then you can set your EVE instance to the IP that your workstation would be in the VMWare setup. That way my scripts will work for you as well during step 5. Here is what my Google Compute instance "/etc/network/interfaces" looks like for eth1/pnet1:
# Cloud devices
iface eth1 inet manual
auto pnet1
iface pnet1 inet static
address 172.16.1.1/24
bridge-ports eth1
bridge-stp off
Step 3 - Importing/Installing the IOSv Image
EVE-NG HowTo Add Images from VIRL
EVE-NG HowTo Add IOL Images
I used
WinSCP to transfer the files (SecureFX/FileZilla/Others are fine..)
I use SecureCRT to SSH, but there are many other clients out there
Step 4 - Importing the INE-ATC Topology
Login to the web portion of the Eve-NG server (Ex: http://192.168.32.132) and login (default is admin/eve)
In the upper left, there is a button to "import" - click it and select the "IINE-CCIE-RSv5-Topologies.zip" file (no need to unzip).
Click "Upload" in the upper right
It should import the .unl topologies and make them available on the left pane. You can click on the topology for the images that you uploaded and click "Open" to bring up the lab. You should now be able to boot up the devices. Depending on your computer, booting them all at once might take much longer than booting them up in a staggered order.
Staggering Boot-Up
I boot up the devices in three "groups". For example, I select R1-R5 and start them up. My CPU will spike for a few minutes and then settle down. Once it does, I select R6-R10 and start those up. Once those are done, I boot up the switches. Depending on your config/system, it will take different amounts of time. Once you figure out how long it takes, you can right click a node and click Edit, and then set a startup delay on that node. For my CSR1000v lab, I have routers 6-10 with a 160 second delay, and the switches with a 400 second delay. The whole thing takes around 8-9 minutes to be ready from when I hit "start all nodes".
If your routers don't boot up, right click one of them and click "Edit". There should be an image listed (mine is "vios-adventerprisek9-m.SPA.156-2.T"). You may have to select the image from the drop-down if it is there. If it is not, then something went wrong during Step 3.
Note for Google Compute: Sometimes (often) I have to try to start the nodes several times, but they eventually go if I keep trying
Step 5 - Transferring the INE configs to each of the routers
NOTE: You should only have to do this once!
These steps are for a VMWare Install - scroll down further for Google Compute Instances
NOTE2: VMWare workstation users can also follow the instructions for Google Compute users, if they prefer to use their EVE-NG box as the TFTP server as opposed to their local machine.
OK, so you have the topology open and booted up now.

As you can see, each of the routers are connected to "VmnetNet1", which should be able to talk to your local VMNet interface. Mine has an IP of "172.16.1.1" - you can check what yours is by issuing "ipconfig" at the command prompt, and looking for "Ethernet adapter VMware Network Adapter VMnet1"
If you don't have one, download a TFTP server. I used
Tftpd32 but there are many out there.
Unzip the "CCIE_RSv5_INE_ATC_CFG.zip" somewhere. For this example, I chose "C:\TFTP_Server\CCIE_RSv5_INE_ATC_CFG: - where xxx = the image you are using.
Open up your TFTP server, and make sure that it is using that exact folder (with the .tar files in it). Also, I had to make sure my "Server Interface" was set to VMnet1 (172.16.1.1 in my case):
If you are using SecureCRT: Here is python script to do the steps that follow automatically:
eveNG-SecureCRT-AutoConfig.zip (download/extract - you'll need to browse to the ".py" file with SecureCRT)
You will need to edit the Python script to select the image that you are using, and set up IP information if it is different. If you right click the .py file and click edit, it should be self-explanatory.
To run them from SecureCRT:
Make sure you have the tab active for the device open and connected. You can connect to the routers by making SecureCRT your default telnet application, or you can manually create sessions. To see the IP/port, hover over the router in the EVE-NG Topology Window and look in the lower left.
Once you are connected and the tab is active, make sure you get the device to the user mode "Router>", not the autoconfig dialog. In SecureCRT go to Script -> Run from the file menu, and then select the script. Give it a little bit, and it should automatically do the below steps for you.
If not using SecureCRT: Then perform the following steps manually (at least it is only once!)
Notes for anything other than IOSv
If you are using something other than IOSv, replace the interface name with the interface that is connected to "Net1" in the EVE topology, and change IOSv in the archive command to CSRv or IOL as appropriate.
Also, for IOL, use "
unix:/config" instead of "
flash:config/"
Note: I tried to remember to export the configs for all of the topologies so that the IP addresses were included. If the router already has a name on initial bootup then it probably already has a "172.16.1.
x" ip address
Log into R1 and do this:
Router>enable
Router#delete /f /r flash:config
Router#
Router#conf t
Router(config)#int g0/0
Router(config-if)#ip add 172.16.1.201 255.255.255.0
Router(config-if)#no shut
Router(config-if)#end
Router#archive tar /xtract tftp://172.16.1.1/IOSv/R1.tar flash:config/
You should see the router copy all 65 configurations to the flash.
Note1: "
delete /f /r flash:config"
is necessary on IOSv (not for CSR1000v or IOL) - I don't know the reason, but if you don't do it then it will not take all of the configs, even though there is plenty of free space in the flash. This caused me some heartache lol.
Note2: If your VMNet interface had a different IP address, then you need to choose another IP address in the same subnet. Since this is a CCIE blog I am going to assume you know what I mean. After you change the IP on the router and "no shut" the interface, you should be able to ping it from your local machine; Ex: "ping 172.16.1.201". If you can't, then double-check the actions that you took in "
Step 2". The Eve-NG website has some great resources if you get stuck here.
Note3: This should be obvious, but do not continue on to R2 if this does not work, because something is wrong. It is time to troubleshoot. Check back through the steps and use Google.
Log into R2 and do this (note the last octet, and R2.tar):
Router>enable
Router#delete /f /r flash:config
Router#
Router#conf t
Router(config)#int g0/0
Router(config-if)#ip add 172.16.1.202 255.255.255.0
Router(config-if)#no shut
Router(config-if)#end
Router#archive tar /xtract tftp://172.16.1.1/IOSv/R2.tar flash:config/
Log into R3 - R10 following the same pattern, making sure you change the last octet for the IP, and the name of the file to "RX.tar", where X = the router number
Log into SW1 and do this:
Switch>enable
Switch#conf t
Enter configuration commands, one per line. End with CNTL/Z.
Switch(config)#int g0/1
Switch(config-if)#no switchport
Switch(config-if)#ip add 172.16.1.111 255.255.255.0
Switch(config-if)#no shut
Switch(config-if)#end
Switch#archive tar /xtract tftp://172.16.1.1/IOSv/SW1.tar flash:config/
Log into SW2 - SW4 following the same pattern, making sure you change the last octet for the IP, and the name of the file to "SWX.tar", where X = the switch number
I also recommend setting the hostnames and saving the configs (copy run start) at this point. That way when the routers boot up, they will boot directly into IOS instead of the auto-configuration dialog. They will also be ready for you to TFTP more configs if that is what you want to do.
Step 5 - With Google Compute Instance
To do this, I had to make my Ubuntu instance server the TFTP server.
root@instance-1:/# apt-get install -y tftpd-hpa
After tftpd-hpa has been installed, you need to configure tftpd-hpa (I can't remember if I had to change anything, so here is my config):
root@instance-1:~# more /etc/default/tftpd-hpa
# /etc/default/tftpd-hpa
TFTP_USERNAME="tftp"
TFTP_DIRECTORY="/var/lib/tftpboot"
TFTP_ADDRESS=":69"
TFTP_OPTIONS="--secure"
root@instance-1:~#
If you had to change something, then you need to restart the tftpd-hpa service for it to take effect:
service tftpd-hpa restart
Now you just have to use SCP (or whatever you want) to move all three folders (IOSv, CSRv, IOL) to "/var/lib/tftpboot". This should allow you to continue as above, except you are using your EVE-NG server itself as the TFTP server. Follow the rest of the steps above to move/extract the configurations to each of the devices.
Step 6 - Get to Labbing!
Now, when I want to switch initial configurations on all of the devices, I simply use config replace and send it to all of the devices in the topology. For IOL, you would use "config replace unix:config/authenticating.bgp.peerings.cfg force" instead
I hit enter, and the routers are all pre-configured for my BGP lab! This takes about 10 seconds on my CSR1000v lab.
There are many other telnet clients that have this functionality, but I use SecureCRT.
Note: If you are using this for INE ATC preparation, I highly recommend you check out this post:
Using Anki For CCIE Preparation
It includes a link to an Anki deck that can be used to schedule the INE ATC labs, which works perfectly with the above solution.